
***GIT Official chat sheet:https://git-scm.com/docs
===================Git Config===================
1. Git configuration
Get and set configuration variables that control all facets of how Git looks and operates.
GIT Object types:
BLOB
Tree
Commit
Note: Each git commit having backed author name & email commit description (parent-optional)

*To view the config list
git config --list
Set the name:
$ git config --global user.name "User name"
Set the email:
$ git config --global user.email "raj@gmail.com"
Set the default editor:
$ git config --global core.editor Vim
Check the setting:
$ git config -list
Git alias
Set up an alias for each command:
$ git config --global alias.co checkout
$ git config --global alias.br branch
$ git config --global alias.ci commit
git commit flow:


git cat-file -p cae3
$ git cat-file -p cae3
tree 3766bcd572091203af9cf2ce582b9e5d40f38610
author shivasingam111 <shivasingam111@gmail.com> 1703058448 +0530
committer shivasingam111 <shivasingam111@gmail.com> 1703058448 +0530
first file change
$ git cat-file -s cae3
200
git cat-file -t cae3
commit


From git log if you wand to know more info about commit
git branch -d brach-name (will delete only merged branch)
if you want to delete the non-merged branch
git branch -D branch-name
Git branch Create branch:
$ git branch List Branch:
$ git branch --list Delete a Branch:
$ git branch -d Delete a remote Branch:
$ git push origin -delete Rename Branch:
$ git branch -m
Git checkout
Switch between branches in a repository.
Switch to a particular branch:
$ git checkout
Create a new branch and switch to it:
$ git checkout -b Checkout a Remote branch:
$ git checkout
Git stash
Switch branches without committing the current branch. Stash current work:
$ git stash
Saving stashes with a message:
$ git stash save ""
Check the stored stashes:
$ git stash list
Re-apply the changes that you just stashed:
$ git stash apply
Track the stashes and their changes:
$ git stash show
Re-apply the previous commits:
$ git stash pop
Delete a most recent stash from the queue:
$ git stash drop
Delete all the available stashes at once:
$ git stash clear
Stash work on a separate branch:
$ git stash branch
Git cherry pic
Apply the changes introduced by some existing commit:
$ git cherry-pick
8. Merging
Git merge
Merge the branches:
$ git merge
Merge the specified commit to currently active branch:
$ git merge
=============================HEAD===============

The HEAD points out the last commit in the current checkout branch. It is like a pointer to any reference. The HEAD can be understood as the "current branch." When you switch branches with 'checkout,' the HEAD is transferred to the new branch.
git show HEAD
git show commitid
***in GIT jump to specific commit the command is:
git checkout the-commit-id
==========================git remote=============================
git clone https://github.com/ImDwivedi1/Git-Example
Some commands in which the term origin and master are widely used are as follows:
Git push origin master
Git pull origin master
** Check your Remote
To check the configuration of the remote server, run the git remote command. The git remote command allows accessing the connection between remote and local. If you want to see the original existence of your cloned repository, use the git remote command. It can be used as:
Syntax:
$ git remote
git remote -v:
Git remote supports a specific option -v to show the URLs that Git has stored as a short name. These short names are used during the reading and write operation. Here, -v stands for verbose. We can use --verbose in place of -v. It is used as:
********Add remote origin to local machine
Syntax:
$ git remote -v
git remote add <short name><remote URL>
ex: git remote add origin https://github.com/shivscloud/git-professional.git
git push -u origin main
****Git Remove Remote
You can remove a remote connection from a repository. To remove a connection, perform the git remote command with remove or rm option. It can be done as:
Syntax:
$ git remote rm <destination>
Or
$ git remote remove <destination>
git remote rename <old name><new name>
git Show Remote
To see additional information about a particular remote, use the git remote command along with show sub-command. It is used as:
Syntax:
$ git remote show <remote>
*****Git Remote Set:
We can change the remote URL simply by using the git remote set command. Suppose we want to make a unique name for our project to specify it. Git allows us to do so. It is a simple process. To change the remote URL, use the below command:
$ git remote set-url <remote name><newURL>
** git tag
git tag <tag name>
git tag show <tagname>
git tag projectv1.0
git push --tags
git tag --delete <tagname>
git push origin -d <tagname>
git checkout -b < new branch name> <tag name> (create a branch with tag)
***Upstream and Downstream
The term upstream and downstream refers to the repository. Generally, upstream is from where you clone the repository, and downstream is any project that integrates your work with other works. However, these terms are not restricted to Git repositories.
There are two different contexts in Git for upstream/downstream, which are remotes and time/history. In the reference of remote upstream/downstream, the downstream repo will be pulled from the upstream repository. Data will flow downstream naturally.
In the reference of time/history, it can be unclear, because upstream in time means downstream in history, and vice-versa. So it is better if we use the parent/child terms in place of upstream/downstream in case of time/history.
**Git set-upstream
git remote -v
The above command will list the branches on the local and remote repository. To learn more about branches, click here. Now push the changes to remote server and set the particular branch as default remote branch for the local repository. To push the changes and set the remote branch as default, run the below command:
$ git push --set-upstream origin master
***We can also set the default remote branch by using the git branch command. To do so, run the below command:
$ git branch --set-upstream-to origin master
==================================GIt DIFF===========================
==========git diff===========================
Git Diff
Git diff is a command-line utility. It's a multiuse Git command. When it is executed, it runs a diff function on Git data sources. These data sources can be files, branches, commits, and more. It is used to show changes between commits, commit, and working tree, etc.
1.Scenerio1: Track the changes that have not been staged.(to check changes in diff files)
Scenerio2: Track the changes that have staged but not committed:
git diff --staged
Scenerio3: Track the changes after committing a file:
git diff HEAD
Scenario4: Track the changes between two commits:
git log
git diff <commit1-sha> <commit2-sha>
git diff <branch 1> < branch 2>
=============================================
Git SVN
It's a distributed version control system. It's a Centralized version control system
Git is an SCM (source code management). SVN is revision control.
Git has a cloned repository. SVN does not have a cloned repository.
The Git branches are familiar to work. The Git system helps in merging the files quickly and also assist in finding the unmerged ones. The SVN branches are a folder which exists in the repository. Some special commands are required For merging the branches.
Git does not have a Global revision number. SVN has a Global revision number.
Git has cryptographically hashed contents that protect the contents from repository corruption taking place due to network issues or disk failures. SVN does not have any cryptographically hashed contents.
Git stored content as metadata. SVN stores content as files.
Git has more content protection than SVN. SVN's content is less secure than Git.
Linus Torvalds developed git for Linux kernel. CollabNet, Inc developed SVN.
Git is distributed under GNU (General public license). SVN is distributed under the open-source license.
Basically git is a distributed and svn is the centrolized
***
Centralized Version Control System Distributed Version Control System
In CVCS, The repository is placed at one place and delivers information to many clients. In DVCS, Every user has a local copy of the repository in place of the central repository on the server-side.
It is based on the client-server approach. It is based on the client-server approach.
It is the most straightforward system based on the concept of the central repository. It is flexible and has emerged with the concept that everyone has their repository.
In CVCS, the server provides the latest code to all the clients across the globe. In DVCS, every user can check out the snapshot of the code, and they can fully mirror the central repository.
CVCS is easy to administrate and has additional control over users and access by its server from one place. DVCS is fast comparing to CVCS as you don't have to interact with the central server for every command.
The popular tools of CVCS are SVN (Subversion) and CVS. The popular tools of DVCS are Git and Mercurial
CVCS is easy to understand for beginners. DVCS has some complex process for beginners.
If the server fails, No system can access data from another system. if any server fails and other systems were collaborating via it, that server can restore any of the client repositories
***** Git Terminology
Some commonly used terms are:
Branch
A branch is a version of the repository that diverges from the main working project. It is an essential feature available in most modern version control systems. A Git project can have more than one branch. We can perform many operations on Git branch-like rename, list, delete, etc.
Checkout
In Git, the term checkout is used for the act of switching between different versions of a target entity. The git checkout command is used to switch between branches in a repository.
Cherry-Picking
Cherry-picking in Git is meant to apply some commit from one branch into another branch. In case you made a mistake and committed a change into the wrong branch, but do not want to merge the whole branch. You can revert the commit and cherry-pick it on another branch.
Clone
The git clone is a Git command-line utility. It is used to make a copy of the target repository or clone it. If I want a local copy of my repository from GitHub, this tool allows creating a local copy of that repository on your local directory from the repository URL.
Fetch
It is used to fetch branches and tags from one or more other repositories, along with the objects necessary to complete their histories. It updates the remote-tracking branches.
HEAD
HEAD is the representation of the last commit in the current checkout branch. We can think of the head like a current branch. When you switch branches with git checkout, the HEAD revision changes, and points the new branch.
Index
The Git index is a staging area between the working directory and repository. It is used as the index to build up a set of changes that you want to commit together.
Master
Master is a naming convention for Git branch. It's a default branch of Git. After cloning a project from a remote server, the resulting local repository contains only a single local branch. This branch is called a "master" branch. It means that "master" is a repository's "default" branch.
Merge
Merging is a process to put a forked history back together. The git merge command facilitates you to take the data created by git branch and integrate them into a single branch.
Origin
In Git, "origin" is a reference to the remote repository from a project was initially cloned. More precisely, it is used instead of that original repository URL to make referencing much easier.
Pull/Pull Request
The term Pull is used to receive data from GitHub. It fetches and merges changes on the remote server to your working directory. The git pull command is used to make a Git pull.
Pull requests are a process for a developer to notify team members that they have completed a feature. Once their feature branch is ready, the developer files a pull request via their remote server account. Pull request announces all the team members that they need to review the code and merge it into the master branch
Push
The push term refers to upload local repository content to a remote repository. Pushing is an act of transfer commits from your local repository to a remote repository. Pushing is capable of overwriting changes; caution should be taken when pushing.
Rebase
In Git, the term rebase is referred to as the process of moving or combining a sequence of commits to a new base commit. Rebasing is very beneficial and visualized the process in the environment of a feature branching workflow.
From a content perception, rebasing is a technique of changing the base of your branch from one commit to another.
Remote
In Git, the term remote is concerned with the remote repository. It is a shared repository that all team members use to exchange their changes. A remote repository is stored on a code hosting service like an internal server, GitHub, Subversion and more.
In case of a local repository, a remote typically does not provide a file tree of the project's current state, as an alternative it only consists of the .git versioning data.
Repository
In Git, Repository is like a data structure used by VCS to store metadata for a set of files and directories. It contains the collection of the file as well as the history of changes made to those files. Repositories in Git is considered as your project folder. A repository has all the project-related data. Distinct projects have distinct repositories.
Stashing
Sometimes you want to switch the branches, but you are working on an incomplete part of your current project. You don't want to make a commit of half-done work. Git stashing allows you to do so. The git stash command enables you to switch branch without committing the current branch
Tag
Tags make a point as a specific point in Git history. It is used to mark a commit stage as important. We can tag a commit for future reference. Primarily, it is used to mark a projects initial point like v1.1. There are two types of tags.
AD
Light-weighted tag
Annotated tag
Upstream And Downstream
The term upstream and downstream is a reference of the repository. Generally, upstream is where you cloned the repository from (the origin) and downstream is any project that integrates your work with other works. However, these terms are not restricted to Git repositories.
Git Revert
In Git, the term revert is used to revert some commit. To revert a commit, git revert command is used. It is an undo type command. However, it is not a traditional undo alternative.
Git Reset
In Git, the term reset stands for undoing changes. The git reset command is used to reset the changes. The git reset command has three core forms of invocation. These forms are as follows.
Soft
Mixed
Hard
Git Ignore
In Git, the term ignore used to specify intentionally untracked files that Git should ignore. It doesn't affect the Files that already tracked by Git.
Git Diff
Git diff is a command-line utility. It's a multiuse Git command. When it is executed, it runs a diff function on Git data sources. These data sources can be files, branches, commits, and more. It is used to show changes between commits, commit, and working tree, etc.
*** Git Cheat Sheet
A Git cheat sheet is a summary of Git quick references. It contains basic Git commands with quick installation. A cheat sheet or crib sheet is a brief set of notes used for quick reference. Cheat sheets are so named because the people may use it without no prior knowledge.
Git Flow
GitFlow is a branching model for Git, developed by Vincent Driessen. It is very well organized to collaborate and scale the development team. Git flow is a collection of Git commands. It accomplishes many repository operations with just single commands.
Git Squash
In Git, the term squash is used to squash previous commits into one. Git squash is an excellent technique to group-specific changes before forwarding them to others. You can merge several commits into a single commit with the powerful interactive rebase command.
Git Rm
In Git, the term rm stands for remove. It is used to remove individual files or a collection of files. The key function of git rm is to remove tracked files from the Git index. Additionally, it can be used to remove files from both the working directory and staging index.
Git Fork
A fork is a rough copy of a repository. Forking a repository allows you to freely test and debug with changes without affecting the original project.
Great use of using forks to propose changes for bug fixes. To resolve an issue for a bug that you found, you can:
Fork the repository.
Make the fix.
Forward a pull request to the project owner.
4. Track changes
Git diff
Track the changes that have not been staged: $ git diff
Track the changes that have staged but not committed:
$ git diff --staged
Track the changes after committing a file:
$ git diff HEAD
Track the changes between two commits:
$ git diff Git Diff Branches:
$ git diff < branch 2>
Git status
Display the state of the working directory and the staging area.
$ git status
Git show Shows objects:
$ git show
5. Commit History
Git log
Display the most recent commits and the status of the head:
$ git log
Display the output as one commit per line:
$ git log -oneline
Displays the files that have been modified:
$ git log -stat
Display the modified files with location:
$ git log -p
Git blame
Display the modification on each line of a file:
$ git blame <file name>
6. Ignoring files
.gitignore
Specify intentionally untracked files that Git should ignore. Create .gitignore:
$ touch .gitignore List the ignored files:
$ git ls-files -i --exclude-standard
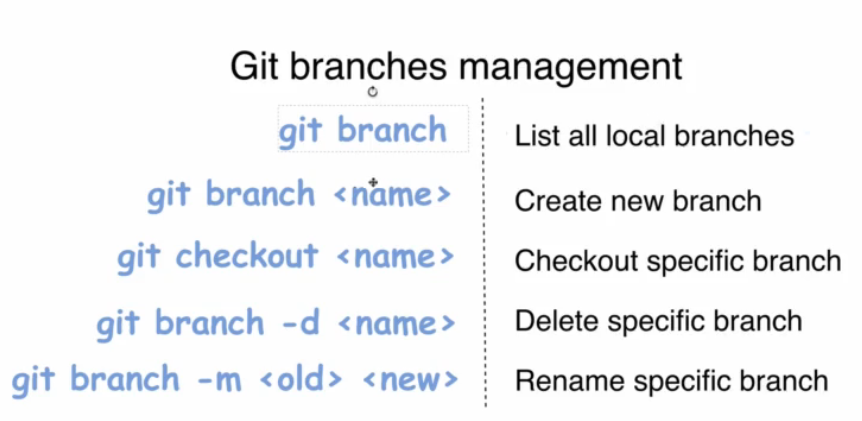
7. Branching
Git branch Create branch:
$ git branch List Branch:
$ git branch --list Delete a Branch:
$ git branch -d Delete a remote Branch:
$ git push origin -delete Rename Branch:
$ git branch -m
Git checkout
Switch between branches in a repository.
Switch to a particular branch:
$ git checkout
Create a new branch and switch to it:
$ git checkout -b Checkout a Remote branch:
$ git checkout
Git stash
Switch branches without committing the current branch. Stash current work:
$ git stash
Saving stashes with a message:
$ git stash save ""
Check the stored stashes:
$ git stash list
Re-apply the changes that you just stashed:
$ git stash apply
Track the stashes and their changes:
$ git stash show
Re-apply the previous commits:
$ git stash pop
Delete a most recent stash from the queue:
$ git stash drop
Delete all the available stashes at once:
$ git stash clear
Stash work on a separate branch:
$ git stash branch
Git cherry pic
Apply the changes introduced by some existing commit:
$ git cherry-pick
8. Merging
Git merge
Merge the branches:
$ git merge
Merge the specified commit to currently active branch:
$ git merge
Git rebase
Apply a sequence of commits from distinct branches into a final commit.
$ git rebase
Continue the rebasing process:
$ git rebase -continue Abort the rebasing process:
$ git rebase --skip
Git interactive rebase
Allow various operations like edit, rewrite, reorder, and more on existing commits.
$ git rebase -i
9. Remote
Git remote
Check the configuration of the remote server:
$ git remote -v
Add a remote for the repository:
$ git remote add Fetch the data from the remote server:
$ git fetch
Remove a remote connection from the repository:
$ git remote rm
Rename remote server:
$ git remote rename
Show additional information about a particular remote:
$ git remote show
Change remote:
$ git remote set-url
Git origin master
Push data to the remote server:
$ git push origin master Pull data from remote server:
$ git pull origin master
10. Pushing Updates
Git push
Transfer the commits from your local repository to a remote server. Push data to the remote server:
$ git push origin master Force push data:
$ git push -f
Delete a remote branch by push command:
$ git push origin -delete edited
11. Pulling updates
Git pull
Pull the data from the server:
$ git pull origin master
Pull a remote branch:
$ git pull
Git fetch
Download branches and tags from one or more repositories. Fetch the remote repository:
$ git fetch< repository Url> Fetch a specific branch:
$ git fetch
Fetch all the branches simultaneously:
$ git fetch -all
Synchronize the local repository:
$ git fetch origin
12. Undo changes
Git revert
Undo the changes:
$ git revert
Revert a particular commit:
$ git revert
Git reset
Reset the changes:
$ git reset -hard
$ git reset -soft:
$ git reset --mixed
13. Removing files
Git rm
Remove the files from the working tree and from the index:
$ git rm <file Name>
Remove files from the Git But keep the files in your local repository:
$ git rm --cached
Staging & commits
git init NewDirectory (.git folder will be created)
git add
git add . or git add -A (both are same)
Add all Modified and Deleted Files
Git ad facilitates us with a variety of options. There is another option that is available in Git, which allows us to stage only the modified and deleted files. It will not stage the newly created file. To stage all modified and deleted files only, run the below command:
$ git add -u
*git commit is used to record the changes in the rep
Git commit -a (this command only tells the only alreaddy added files if any changes it will give the information if you created a new file u made any chnage it wont show any info
We can also use the -am option for already staged files. This command will immediately make a commit for already staged files with a commit message. It will run as follows:
$ git commit -am "Commit message."
** git clone
git clone url
git clone -b specificbranchname urlofgi
** git stash
The git stash command enables you to switch branches without committing the current branch.
after adding the files to stash the file use below command
git stash
while stashing if u want to add any messages u can use the below command
git stash save "<Stashing Message>"
git stash list (to lisst all stahes)
$ git stash list
stash@{0}: WIP on main: dfd53da pushing code changes
** Git Stash Apply
You can re-apply the changes that you just stashed by using the git stash command. To apply the commit, use the git stash command, followed by the apply option. It is used as
Syntax:
$ git stash apply
git stash apply <stash id>
Git Stash Changes
We can track the stashes and their changes. To see the changes in the file before stash and after stash operation, run the below command:
Syntax:
$ git stash show
**Git Stash Pop (Reapplying Stashed Changes)\
git statsh apply and pop are bot are same the only difference is after statshing the stack the stash will be deleted in statsh pop
The git stash pop command is quite similar to git stash apply. The main difference between both of these commands is stash pop command that deletes the stash from the stack after it is applied.
Syntax:
$ git stash pop
example:
$ git stash pop
On branch main
Your branch is up to date with 'origin/main'.
Changes to be committed:
(use "git restore --staged <file>..." to unstage)
new file: test
Untracked files:
(use "git add <file>..." to include in what will be committed)
Dropped refs/stash@{0} (fdfb9f754d272550757faf1aca84ab5f754d7304)
***Git Stash Drop (Unstash)
Git Stash Drop (Unstash)
The git stash drop command is used to delete a stash from the queue. Generally, it deletes the most recent stash. Caution should be taken before using stash drop command, as it is difficult to undo if once applied.
The only way to revert it is if you do not close the terminal after deleting the stash. The stash drop command will be used as:
Syntax:
$ git stash drop
Output:
Git Stash
In the above output, the most recent stash (stash@{0}) has been dropped from given three stashes. The stash list command lists all the available stashes in the queue.
We can also delete a particular stash from the queue. To delete a particular stash from the available stashes, pass the stash id in stash drop command. It will be processed as:
Syntax:
$ git stash drop <stash id>
Assume that I have two stashes available in my queue, and I don't want to drop my most recent stash, but I want to delete the older one. Then, it will be operated as:
$ git stash drop stash@{1}
*** statsh clear
it will clear all stash in our rep
*** .gitignore
vi .gitignore
*.txt
/foldername/*
$ git add .gitignore
$ git commit -m "ignored directory created."
** Fork vs. Clone
Sometimes people considered the fork as clone command because of their property. Both commands are used to create another copy of the repository. But the significant difference is that the fork is used to create a server-side copy, and clone is used to create a local copy of the repository.
There is no particular command for forking the repository; instead, it is a service provided by third-party Git service like GitHub. Comparatively, git clone is a command-line utility that is used to create a local copy of the project.
Generally, people working on the same project clone the repository and the external contributors fork the repository.
A pull request can merge the changes made on the fork repository. We can create a pull request to propose changes to the project. Comparatively, changes made on the cloned repository can be merged by pushing. We can push the changes to our remote repository.
** Git Index
The Git index is a staging area between the working directory and repository. It is used to build up a set of changes that you want to commit together. To better understand the Git index, then first understand the working directory and repository.
Working directory:
When you worked on your project and made some changes, you are dealing with your project's working directory. This project directory is available on your computer's filesystem. All the changes you make will remain in the working directory until you add them to the staging area.
Staging area:
The staging area can be described as a preview of your next commit. When you create a git commit, Git takes changes that are in the staging area and make them as a new commit. You are allowed to add and remove changes from the staging area. The staging area can be considered as a real area where git stores the changes.
Although, Git doesn't have a dedicated staging directory where it can store some objects representing file changes (blobs). Instead of this, it uses a file called index.
Repository:
In Git, Repository is like a data structure used by GIt to store metadata for a set of files and directories. It contains the collection of the files as well as the history of changes made to those files. Repositories in Git is considered as your project folder. A repository has all the project-related data. Distinct projects have distinct repositories.
You can check what is in the index by the git status command. The git status command allows you to see which files are staged, modified but not yet staged, and completely untracked. Staged files mean, it is currently in the index. See the below example.
Syntax:
$ git status
Git Head\
The HEAD points out the last commit in the current checkout branch. It is like a pointer to any reference. The HEAD can be understood as the "current branch." When you switch branches with 'checkout,' the HEAD is transferred to the new branch.
git show HEAD
git show commitid
**git clone https://github.com/ImDwivedi1/Git-Example
Some commands in which the term origin and master are widely used are as follows:
Git push origin master
Git pull origin master
** Check your Remote
To check the configuration of the remote server, run the git remote command. The git remote command allows accessing the connection between remote and local. If you want to see the original existence of your cloned repository, use the git remote command. It can be used as:
Syntax:
$ git remote
Git remote -v:
Git remote supports a specific option -v to show the URLs that Git has stored as a short name. These short names are used during the reading and write operation. Here, -v stands for verbose. We can use --verbose in place of -v. It is used as:
Syntax:
$ git remote -v
git remote add <short name><remote URL>
****Git Remove Remote
You can remove a remote connection from a repository. To remove a connection, perform the git remote command with remove or rm option. It can be done as:
Syntax:
$ git remote rm <destination>
Or
$ git remote remove <destination>
git remote rename <old name><new name>
Git Show Remote
To see additional information about a particular remote, use the git remote command along with show sub-command. It is used as:
Syntax:
$ git remote show <remote>
*****Git Remote Set:
We can change the remote URL simply by using the git remote set command. Suppose we want to make a unique name for our project to specify it. Git allows us to do so. It is a simple process. To change the remote URL, use the below command:
$ git remote set-url <remote name><newURL>
** git tag
git tag <tag name>
git tag show <tagname>
git tag projectv1.0
git push --tags
git tag --delete <tagname>
git push origin -d <tagname>
git checkout -b < new branch name> <tag name> (create a branch with tag)
***Upstream and Downstream
The term upstream and downstream refers to the repository. Generally, upstream is from where you clone the repository, and downstream is any project that integrates your work with other works. However, these terms are not restricted to Git repositories.
There are two different contexts in Git for upstream/downstream, which are remotes and time/history. In the reference of remote upstream/downstream, the downstream repo will be pulled from the upstream repository. Data will flow downstream naturally.
In the reference of time/history, it can be unclear, because upstream in time means downstream in history, and vice-versa. So it is better if we use the parent/child terms in place of upstream/downstream in case of time/history.
**Git set-upstream
git remote -v
The above command will list the branches on the local and remote repository. To learn more about branches, click here. Now push the changes to remote server and set the particular branch as default remote branch for the local repository. To push the changes and set the remote branch as default, run the below command:
$ git push --set-upstream origin master
***We can also set the default remote branch by using the git branch command. To do so, run the below command:
$ git branch --set-upstream-to origin master
====================undoing changes============================
git branch branchname(to creaye a branch)
git checkout branchname(to switch the branchname)
Create and Switch Branch
The git checkout commands let you create and switch to a new branch. You can not only create a new branch but also switch it simultaneously by a single command. The git checkout -b option is a convenience flag that performs run git branch <new-branch>operation before running git checkout <new-branch>.
Syntax:
$ git checkout -b <branchname>
git fetch --all
git checkout <remotebranch>
***Git Revert
In Git, the term revert is used to revert some changes. The git revert command is used to apply revert operation. It is an undo type command. However, it is not a traditional undo alternative. It does not delete any data in this process; instead, it will create a new change with the opposite effect and thereby undo the specified commit. Generally, git revert is a commit.
It can be useful for tracing bugs in the project. If you want to remove something from history then git revert is a wrong choice.
Moreover, we can say that git revert records some new changes that are just opposite to previously made commits. To undo the changes, run the below command:
Syntax:
$ git revert
Git Revert Options:
Git revert allows some additional operations like editing, no editing, cleanup, and more. Let's understand these options briefly:
< commit>: The commit option is used to revert a commit. To revert a commit, we need the commit reference id. The git log command can access it.
$ git revert <commit-ish>
***Git Reset
The term reset stands for undoing changes. The git reset command is used to reset the changes. The git reset command has three core forms of invocation. These forms are as follows.
Soft
Mixed
Hard
If we say in terms of Git, then Git is a tool that resets the current state of HEAD to a specified state. It is a sophisticated and versatile tool for undoing changes. It acts as a time machine for Git. You can jump up and forth between the various commits. Each of these reset variations affects specific trees that git uses to handle your file in its content.
Additionally, git reset can operate on whole commits objects or at an individual file level. Each of
In the above output, I have added a file named newfile2.txt. I have checked the status of the repository. We can see that the current head position yet not changed because I have not committed the changes. Now, I am going to perform the reset --hard option. The git reset hard command will be performed as:
$ git reset --hard
***The git rm command
The git rm command is used to remove the files from the working tree and the index.
If we want to remove the file from our repository. Then it can be done by the git rm command. Let's take a file say newfile.txt to test the rm command. The git rm command will be operated as:
$ git rm <file Name>
The above command will remove the file from the Git and repository. The git rm command removes the file not only from the repository but also from the staging area. If we check the status of the repository, then it will show as deleted. Consider the below output:
Undo the Git Rm Command
Execution of git rm command is not permanent; it can be reverted after execution. These changes cannot be persisted until a new commit is made on the repository. We can undo the git rm command. There are several ways to do so. The most usual and straight-forward way is git reset command. The git reset command will be used as follows:
***$ git reset HEAD
Or we can also use:
$ git reset --hard
The above command will reset the position of the head. So that it will get the position of its just previous point. Consider the below output:
*****Git Cherry-pick
Cherry-picking in Git stands for applying some commit from one branch into another branch. In case you made a mistake and committed a change into the wrong branch, but do not want to merge the whole branch. You can revert the commit and apply it on another branch.
Why Cherry-Pick
Suppose you are working with a team of developers on a medium to large-sized project. Some changes proposed by another team member and you want to apply some of them to your main project, not all. Since managing the changes between several Git branches can become a complex task, and you don't want to merge a whole branch into another branch. You only need to pick one or two specific commits. To pick some changes into your main project branch from other branches is called cherry-picking
Some scenarios in which you can cherry-pick:
Scenerio1: Accidently make a commit in a wrong branch.
Git cherry-pick is helpful to apply the changes that are accidentally made in the wrong branch. Suppose I want to make a commit in the master branch, but by mistake, we made it in any other branch. See the below commit.
git cherry-pick <commit id>
=====================inspecting changes=================================
Git Log Oneline
The oneline option is used to display the output as one commit per line. It also shows the output in brief like the first seven characters of the commit SHA and the commit message.
It will be used as follows:
$ git log --oneline
example:
dfd53da (HEAD -> main, origin/main, origin/HEAD, raj) pushing code changes
6169d5e new chnages
cad1cb9 ff
0ad5d60 maded changes
99ab375 new folder
ac3ca26 Delete 03-Kubernetes-Fundamentals directory
493c9c7 first commit
==========git diff===========================
Git Diff
Git diff is a command-line utility. It's a multiuse Git command. When it is executed, it runs a diff function on Git data sources. These data sources can be files, branches, commits, and more. It is used to show changes between commits, commit, and working tree, etc.
1.Scenerio1: Track the changes that have not been staged.(to check changes in diff files)
Scenerio2: Track the changes that have staged but not committed:
git diff --staged
Scenerio3: Track the changes after committing a file:
git diff HEAD
Scenario4: Track the changes between two commits:
git log
git diff <commit1-sha> <commit2-sha>
git diff <branch 1> < branch 2>
======================branching============
git branch or git branch --list
* delete a branch
git branch -d<branch name>
* delete a remote branch
git push origin -delete <branch name>
* Switch Branch
git checkout <branch name>
* checkout to master branch
git branch -m master
*Rename Branch
git branch -m <old branch name><new branch name>
*Merge branch
git merge <branch name>
Scenario1: To merge the specified commit to currently active branch:
Use the below command to merge the specified commit to currently active branch.
$ git merge <commit>
How to Rebase
When you made some commits on a feature branch (test branch) and some in the master branch. You can rebase any of these branches. Use the git log command to track the changes (commit history). Checkout to the desired branch you want to rebase. Now perform the rebase command as follows:
Syntax:
$git rebase <branch name>
If there are some conflicts in the branch, resolve them, and perform below commands to continue changes:
$ git status
It is used to check the status,
$git rebase --continue
The above command is used to continue with the changes you made. If you want to skip the change, you can skip as follows:
$ git rebase --skip
When the rebasing is completed. Push the repository to the origin. Consider the below example to understand the git merge command.
Suppose that you have a branch say test2 on which you are working. You are now on the test2 branch and made some changes in the project's file newfile1.txt.
Add this file to repository:
$ git add newfile1.txt
Now, commit the changes. Use the below command:
$ git commit -m "new commit for test2 branch."
The output will look like:
[test2 a835504] new commitfor test2 branch
1 file changed, 1 insertion(+)
Switch the branch to master:
$ git checkout master
Output:
Switched to branch 'master.'
Your branch is up to date with 'origin/master.'
Now you are on the master branch. I have added the changes to my file, says newfile.txt. The below command is used to add the file in the repository.
$ git add newfile.txt
Now commit the file for changes:
$ git commit -m " new commit made on the master branch."
************
Git Merge Git Rebase
Merging creates a final commit at merging. Git rebase does not create any commit at rebasing.
It merges all commits as a single commit. It creates a linear track of commits.
It creates a graphical history that might be a bit complex to understand. It creates a linear history that can be easily understood.
It is safe to merge two branches. Git "rebase" deals with the severe operation.
Merging can be performed on both public and private branches. It is the wrong choice to use rebasing on public branches.
Merging integrates the content of the feature branch with the master branch. So, the master branch is changed, and feature branch history remains consistence. Rebasing of the master branch may affect the feature branch.
Merging preserves history. Rebasing rewrites history.
Git merge presents all conflicts at once. Git rebase presents conflicts one by one.
=====================================
Git Squash Commits
Being a responsible contributor to Git, it is necessary to make the collaboration process efficient and meaningful. Git allows some powerful collaboration tools in different ways. Git squash is one of the powerful tools that facilitate efficient and less painful collaboration.
The squash is not any command; instead, it's one of many options available to you under git interactive rebases. The squash allows us to rewrite history. Suppose we have made many commits during the project work, squashing all the commits into a large commit is the right choice than pushing. Let's understand how to squash two commits.
Step1: Check the commit history
To check the commit history, run the below command:
$ git log --oneline
Step 2: Choose the commits to squash.
Suppose we want to squash the last commits. To squash commits, run the below command:
$ git rebase -i HEAD ~3
*** git fetch
git fetch <branch URL><branch name>
Scenario 3: To fetch all the branches simultaneously:
The git fetch command allows to fetch all branches simultaneously from a remote repository. See the below example:
$ git fetch -all
Scenario 4: To synchronize the local repository:
Suppose, your team member has added some new features to your remote repository. So, to add these updates to your local repository, use the git fetch command. It is used as follows.
Syntax:
$ git fetch origin
Differences between git fetch and git pull
To understand the differences between fetch and pull, let's know the similarities between both of these commands. Both commands are used to download the data from a remote repository. But both of these commands work differently. Like when you do a git pull, it gets all the changes from the remote or central repository and makes it available to your corresponding branch in your local repository. When you do a git fetch, it fetches all the changes from the remote repository and stores it in a separate branch in your local repository. You can reflect those changes in your corresponding branches by merging.
git pull = git fetch + git merge
git push
git push <remote><branch> -f
Delete a Remote Branch
We can delete a remote branch using git push. It allows removing a remote branch from the command line. To delete a remote branch, perform below command:
Syntax:
$ git push origin -delete edited(bracnh name)

0 Comments